Posts

Showing posts from August, 2024

6 channel Remote Control (Part 1)

Image
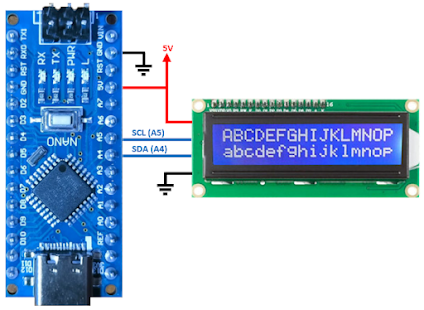
After successfull 2 channel remote control experiment, it is time to improve it. The plan is to build 6 channel remote control. Six analog input use for throttle, rudder, aileron, elevator and 2 extra not sure for what yet but since there are 2 analog input left, don't waste it 😁. Pin A4 and A5 will be use for I2C LCD display in near future but as a result I dont have analog pin to measure the battery voltages πŸ˜₯. I'm thinking to use MAX17044 but somehow no one sell the module. They do sell MAX17043 version but that for 1 cell. The transmitter and receiver connection are seen from picture below. Transmitter connection: Receiver connection: After some wiring, this is what the transmitter look like. The LCD is just for show 😁, curently not operatiol yet. The receiver wiring is straight forward. The receiver will be powered 5V from ESC Video of it in action πŸ˜‰.

NRF24L01 Module

Image
There are many type of NRF24L01 module available in the market. They come with different configurations, some have on board antenna, external antenna, Power Amplifier (PA) and Low Noise Amplifier (LNA). I summarize different model on the table below. All of the information are gathered from various internet sources such as eBay, Amazon, AliExpress, hobbyist website, etc. It may or may not be correctπŸ˜›. I only put the information that I'm interested in such as module size, power consumption and communication range, others not so much. I'm not sure who is the manufacturer of these module, only the E01-ML01DP5 (the one with metal casing) was manufactured by Ebyte and you can visit their website for more information https://www.cdebyte.com/products/E01-ML01DP5 .

2 Channel Remote Control (Part 2)

Image
After 2 weeks of waiting, finally parts are arrived 😁. Let get to it and built 2 channel remote control. You can easily expand the number of channel, depending on number of IO port available, but for now lets built 2 channel for prove of concept. 2 channel probably enough for simple remote control car. The Arduino Nano connection for transmitter can be seen below. There is no particular reason why using A5 and A7, you can use any other pin, just assign accordingly on the code. Remember if you need analog input, use the ADC pin. Code for the transmitter:      #include <SPI.h>      #include <nRF24L01.h>      #include <RF24.h>      const uint64_t pipeOut = 123456 ;      // Must be same as in the receiver      RF24 radio ( 9 , 10 ) ;                    // Select CE, CSN pin      struct Signal {    ...

Arduino Nano I2C 1602 LCD Module

Image
Just received 16x2 characters LCD with I2C interface (PCF8574T). Take note, you need to adjust the potentiometer at the I2C module, that potentiometer is used to adjust LCD contrast. Write anything on the screen, then slowly adjust until you can see the character. Objective:  Print some text on I2C 1602 LCD module Create custom icon Animate custom icon What you need: Arduino Nano I2C 1602 LCD module (S$2.87) LCD connection to Arduino Nano is straight forward. Connect VCC, GND, SDA to A4 and SCL to A5 Code to control 16x2 LCD with I2C interface:           #include <LCD_I2C.h>           LCD_I2C lcd ( 0x 27 , 16 , 2 ) ;      // set the LCD address           int cnt = 100 ;           bool anime = true ;           byte icon1[] = {      // Custom battery icon           ...

A2212/5T 2450KV

Image
I wanted to post screen capture of the motor that I bought, just for personal note. Otherwise I most likely forgot the specification in a week time or less. There is no particular reason why I choose this motor, it just happen to see a bundle deal "Brushless motor + ESC" for S$10 πŸ˜‚. Many of specification mention are confusing, I have no idea what it mean πŸ˜›. After some googling: A2212/5T: 22 is the stator diameter in mm, 12 is stator height in mm. 5T is the number of turn per pole. Its the inner core size, not the outer motor size KV: RPM per Volt, 2450KV = 2450 RPM when supply with 1 Volt Max Current 12A/60S: mean can operate at 12A for maximum 60 seconds before it melt, maybe 😱 Load Current 25.2A: The maximum current the motor winding are designed to draw under specific conditions Max current = 12A/60S and load current = 25.2A, does it mean at max load the motor will burn? Why the load current is greater than max current? How do I choose battery to run this motor? Do I ne...

I just killed Arduino Nano 😭

Image
I was in the middle of experimenting with nRF24. It was working properly but suddenly the receiver was off, power led also off. I removed all connection and components one by one and discovered the electrolyte capacitor is causing the issue. I measure the capacitor resistance is around 0.69 ohm. (Picture below show 1.69 ohm but using proper probe it is actually 0.69 ohm) I connect back everything and it is still no working. I measure the 5V voltage drop to 2.9V, something else is dead. Looking at schematic, look like the diode is burn. It cannot handle 7.25A (5V/0.69)😬. Looking at the SD101CWS spec, there is might be design mistake. Forward current is only 30mA, too low. Imagine 10 output connected to 20mA LED, that already 200mA. The original Arduino Nano is using SS1P3L which have forward current of 1.5A SD101CWS forward current spec: SS1P3L forward current spec: I removed everything again and measure the current drawn by Arduino Nano. It show zero, although I expect some current be...

Arduino Nano Servo and Motor Control

Image
Checked Aliexpress today and the shipping status of all ordered parts for Remote Control project are shipped πŸ˜„, wait for approximately 2 weeks to arrive 😭. In the mean time, let learn Arduino Nano programming. First thing I have in mind is how to control servo using Arduino. This will help Remote Control project later on since it will need to control servo.  Objective:  Sweep servo motor using potentiometer Control motor speed using potentiometer What you need: Arduino Nano Servo motor Brushless motor + ESC (Electronics Speed Controller) 10K potentiometer By the way, I'm Arduino newbie, the code work for me but there may be other way to doing it better 😝 The circuit connection is shown on picture below, connect 10K (can be other value) potentiometer on analog input A0 and connect servo motor on digital output D9. 2x18650 Lithium Ion battery will be connected to ESC and ESC will provide 5V to the Arduino Nano so you do not need to provide separate power to Arduino Nano. The ...

2 Channel Remote Control (Part 1)

My first project is making remote control but maybe it is probably to ambitious since I have zero experience in Arduino programming 😨. I've been googling for the past few days on how to DIY remove control. Saw YouTube video from KendinYap which kind of exactly what I'm planning to make. However, I'm not planning to make RC Plane, Singapore is densely populated, almost everywhere are no-fly zones. You also need to register or need to have certificate  to fly depending on the plane weight. Recently there was tourist from China was fine S$10.000 😱 because unknowingly flying DJI drone above certain height. Anyway, let first source for components listed below. There are other discrete components like resistor, capacitor, LED, socket, battery, etc. which I did not list down. All of them are ordered from Aliexpress. I'm not going to put a link on each component since the price is dynamic, will change within 1 or 2 weeks. The most expensive component is long range nRF24L01P ...

Arduino Nano clone (fake FT232RL)

Image
Couple weeks ago, out of curiosity, I just bought Arduino Nano from Aliexpress. I saw it was on sale for S$1.39 (tax included). Arduino Nano with USB=C cable for S$1.39 is very-very cheap 😊, other shop sell at around S$3+ (at this time I did not know it was clone). After about 2 weeks of waiting, it is finally arrived. This thing is tiny, measured around 1.7 x 4.3 cm. Looking at the soldering are good and clean, I'm pretty happy with the product. 😊 I download the IDE 2.3.2 software from official Arduino website ( https://www.arduino.cc/en/software ). This is the time I realize it is a clone because the original Arduino Nano price at US$21.17 🀯 from the official website. With the price different, there is no way I bough the original πŸ˜‚. I'm trying to share my first experience experimenting with Arduino Nano because it is not a smooth sail, although with the help of google search, I manage to overcome itπŸ˜‰. First of all , you need internet connection when open IDE software for...