Arduino Nano I2C 1602 LCD Module
Just received 16x2 characters LCD with I2C interface (PCF8574T). Take note, you need to adjust the potentiometer at the I2C module, that potentiometer is used to adjust LCD contrast. Write anything on the screen, then slowly adjust until you can see the character.
Objective:
- Print some text on I2C 1602 LCD module
- Create custom icon
- Animate custom icon
What you need:
- Arduino Nano
- I2C 1602 LCD module (S$2.87)
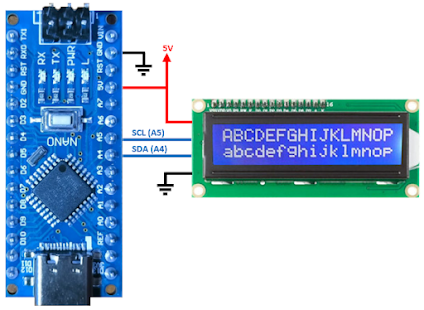
LCD connection to Arduino Nano is straight forward. Connect VCC, GND, SDA to A4 and SCL to A5
Code to control 16x2 LCD with I2C interface:
#include <LCD_I2C.h>
LCD_I2C lcd(0x27, 16, 2); // set the LCD address
int cnt = 100;
bool anime = true;
byte icon1[] = { // Custom battery icon
B01110,
B11111,
B10001,
B11111,
B10001,
B11111,
B10001,
B11111
};
byte icon2[] = { // Custom fan_a icon
B00000,
B00000,
B11001,
B01011,
B00100,
B11010,
B10011,
B00000
};
byte icon3[] = { // Custom fan_b icon
B00000,
B00000,
B10011,
B11010,
B00100,
B01011,
B11001,
B00000
};
void setup() {
lcd.begin();
delay (500);
lcd.clear();
lcd.backlight();
lcd.setCursor(0,0);
lcd.print("Drone Batt:");
lcd.createChar(0, icon1);
lcd.createChar(1, icon2);
lcd.createChar(2, icon3);
lcd.setCursor(0,1);
lcd.write(byte(0)); // Display batter icon
}
void loop() {
lcd.setCursor(12,0); // Countdown percentage
if (cnt == 100){
lcd.print(String(cnt) + "%");
}
else if ((cnt < 100) && (cnt > 9)){
lcd.print(" " + String(cnt) + "%");
}
else {
lcd.print(" " + String(cnt) + "%");
}
cnt = cnt - 1;
if (cnt < 0) {
cnt = 100;
}
if (anime == true){ // Animated the fan icon
lcd.setCursor(1,1);
lcd.write(byte(1)); // Display fan_a
anime = false;
}
else {
lcd.setCursor(1,1);
lcd.write(byte(2)); // Display fan_b
anime = true;
}
delay(1000);
}
Sort video on 16x2 LCD display:


Comments
Post a Comment